Hi guys,
I saw a video of a new modified BMW which the factory fuel gauge is used to display boost. It shows the current fuel level but then swings to show boost. I thought this was a great idea and stealthy. The car had the typical go fast mods so I guess this was done as part of the flash tune.
I assume only the latest model cars could implement this so I guess only the ND? Would there be a way to do this to NAs or NBs - I imagine not without major mods to the stock gauge? You could do this to the useless oil pressure gauge, thus avoiding replacing the whole gauge.
Hijacking existing dials to display boost
Moderators: timk, Stu, zombie, Andrew, -alex, miata
-
bruce

- Speed Racer
- Posts: 7662
- Joined: Fri Apr 25, 2003 11:00 am
- Vehicle: NA8 - Turbo
- Location: Victoria
- Contact:
-
Lokiel

- Forum legend
- Posts: 4126
- Joined: Thu May 28, 2009 2:39 pm
- Vehicle: NB SE
- Location: Brisbania
Re: Hijacking existing dials to display boost
You want the "95MSM Boost Gauge Mod" as I've dubbed it after the username of the guy on the MazdaSpeed forum who did it originally on his 95 NA that he'd fitted an MSM engine to.
Note: The OEM oil gauge is just a switch so you could connect it to an LED to maintain the existing "Oil Pressure" functionality.
Step 1: Order a SpeedHut gauge with the colour and text font that matches your gauges (they've reduced the options since I first ordered mine unfortunately but you should still be able to get close to what you want). Get over "the sticker shock", it's worth it!
Step 2. Disassemble your Speed Hut gauge (everything just unscrews):
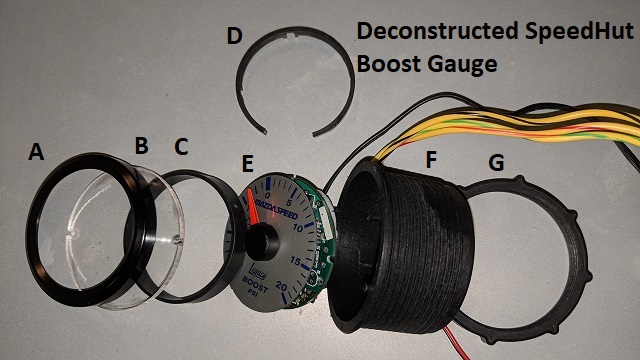
BE CAREFUL NOT TO TOUCH THE GAUGE FASCIA WITH BARE HANDS, IT'LL MARK-UP VERY EASILY FROM THE OIL ON YOUR HANDS!
Step 3: Pull out your instrument cluster and remove the dumb oil-pressure gauge:
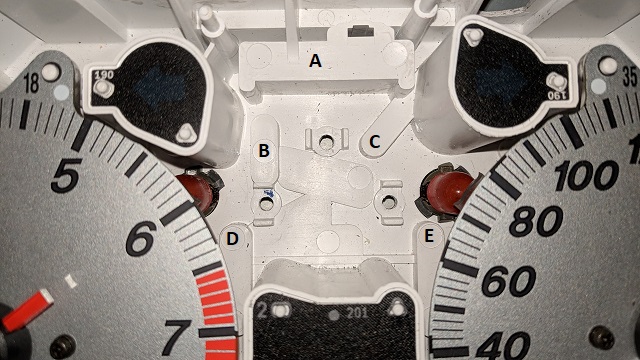
A, B and C in this picture are instrument cluster molding "risers" which make it difficult to fit most aftermarket gauges.
Step 4: Cut a hole in the top of the instrument cluster for wiring to enter (photo coming later)
Step 5: Either file down the original plastic SpeedHut plastic cup (picture 1's "F" component) threads until it fits in the original slot and drill some holes in the base matching the existing 3x screw holes to secure it in place (Note" There's a LOT of plastic to be filed down)
OR
Ask THIS guy really nicely for a custom-made 3D-printed cup and locking ring.
Step 6: Push the gauge wiring from picture 1's E component through the exit point of the cup and out the instrument cluster exit hole at the top.
Step 7: Secure the cup in place:
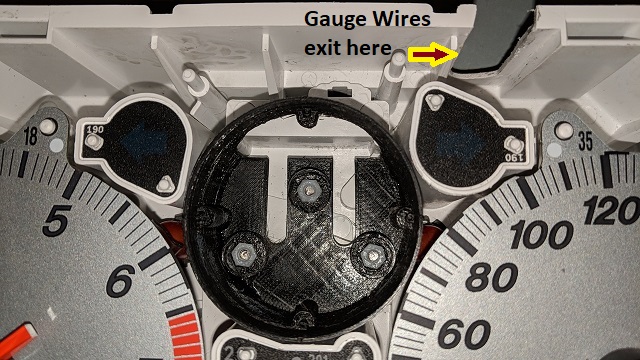
This photo is my original PLA-filament cup - I prefer PETG now.
I had 3x professionally-printed carbon filament copies made that use 3mm brass inserts for the screws; they look fantastic and make installation VERY easy.
You can see the instrument cluster slot at the top I cut out for the wires - better to make the smallest hole possible.
Step8: Install the gauge fascia+PCB board (picture 1's E component) into the cup, align it and insert the locking ring (picture 1's D component) or the 3D-printed one.
Note: When I originally used the original SpeedHut cup, I had to insert a thin plastic ship at about the 2 o'clock position to force it left a bit - the 3D-printed cup is aligned correctly.
Step9: Install your cluster.
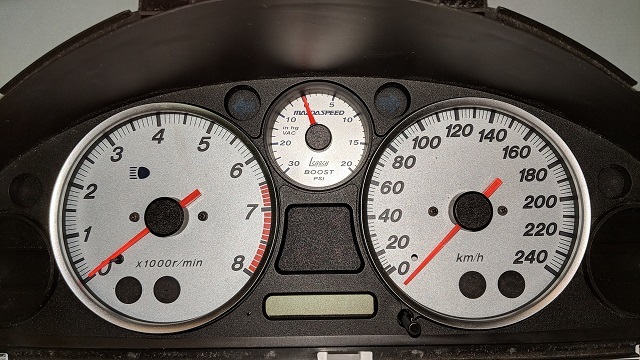
THIS is where a boost gauge SHOULD have been fitted and installed in a turbo car MAZDA!
Does that NOT look OEM to anyone?
I don't mind supplying the 3D cup and locking ring using PetG filament for the cost of P&H.
Unfortunately I haven't had much luck with Carbon filament using my Prusa Mk3s 3D printer but if enough people are interested in this, we could split the cost of getting them printed professionally and I'll insert the brass inserts for the 3mm mounting screws.
PetG versions will have 3mm hex-nut slots that 3mm screw thread into - they can be a little annoying since you need to face the cluster upwards when screwing in the cup and keep a finger over the nut hole to keep it from being pushed out while screwing in the screw - NOT a biggie but still annoying.
Note: The OEM oil gauge is just a switch so you could connect it to an LED to maintain the existing "Oil Pressure" functionality.
Step 1: Order a SpeedHut gauge with the colour and text font that matches your gauges (they've reduced the options since I first ordered mine unfortunately but you should still be able to get close to what you want). Get over "the sticker shock", it's worth it!
Step 2. Disassemble your Speed Hut gauge (everything just unscrews):
BE CAREFUL NOT TO TOUCH THE GAUGE FASCIA WITH BARE HANDS, IT'LL MARK-UP VERY EASILY FROM THE OIL ON YOUR HANDS!
Step 3: Pull out your instrument cluster and remove the dumb oil-pressure gauge:
A, B and C in this picture are instrument cluster molding "risers" which make it difficult to fit most aftermarket gauges.
Step 4: Cut a hole in the top of the instrument cluster for wiring to enter (photo coming later)
Step 5: Either file down the original plastic SpeedHut plastic cup (picture 1's "F" component) threads until it fits in the original slot and drill some holes in the base matching the existing 3x screw holes to secure it in place (Note" There's a LOT of plastic to be filed down)
OR
Ask THIS guy really nicely for a custom-made 3D-printed cup and locking ring.
Step 6: Push the gauge wiring from picture 1's E component through the exit point of the cup and out the instrument cluster exit hole at the top.
Step 7: Secure the cup in place:
This photo is my original PLA-filament cup - I prefer PETG now.
I had 3x professionally-printed carbon filament copies made that use 3mm brass inserts for the screws; they look fantastic and make installation VERY easy.
You can see the instrument cluster slot at the top I cut out for the wires - better to make the smallest hole possible.
Step8: Install the gauge fascia+PCB board (picture 1's E component) into the cup, align it and insert the locking ring (picture 1's D component) or the 3D-printed one.
Note: When I originally used the original SpeedHut cup, I had to insert a thin plastic ship at about the 2 o'clock position to force it left a bit - the 3D-printed cup is aligned correctly.
Step9: Install your cluster.
THIS is where a boost gauge SHOULD have been fitted and installed in a turbo car MAZDA!
Does that NOT look OEM to anyone?
I don't mind supplying the 3D cup and locking ring using PetG filament for the cost of P&H.
Unfortunately I haven't had much luck with Carbon filament using my Prusa Mk3s 3D printer but if enough people are interested in this, we could split the cost of getting them printed professionally and I'll insert the brass inserts for the 3mm mounting screws.
PetG versions will have 3mm hex-nut slots that 3mm screw thread into - they can be a little annoying since you need to face the cluster upwards when screwing in the cup and keep a finger over the nut hole to keep it from being pushed out while screwing in the screw - NOT a biggie but still annoying.
Don't worry about dying, worry about not living!
Garage Thread: http://www.mx5cartalk.com/forum/viewtopic.php?f=57&t=76716
Garage Thread: http://www.mx5cartalk.com/forum/viewtopic.php?f=57&t=76716
-
Roadrunner

- coyotes after you
- Posts: 1108
- Joined: Tue Nov 06, 2012 9:02 pm
- Vehicle: NB SE
- Location: Newcastle
Re: Hijacking existing dials to display boost
Unfortunately I haven't had much luck with Carbon filament using my Prusa Mk3s 3D printer but if enough people are interested in this, we could split the cost of getting them printed professionally and I'll insert the brass inserts for the 3mm mounting screws.
I'd be in for 2 if that happens
MeepMeep
-
bruce
- Speed Racer
- Posts: 7662
- Joined: Fri Apr 25, 2003 11:00 am
- Vehicle: NA8 - Turbo
- Location: Victoria
- Contact:
Re: Hijacking existing dials to display boost
Not really the answer I was looking for. You could possibly do something like I saw with an ND as maybe the mod has something to do with the Canbus system (just a guess)? Earlier cars are just too dumb.
-
ManiacLachy

- Forum Guru
- Posts: 3234
- Joined: Mon Jan 13, 2014 2:35 pm
- Vehicle: NB SE
- Location: Brisbane
Re: Hijacking existing dials to display boost
There is the CANChecked display, its a multi-function display that you can integrate like the mechanical boost gauge above, it can show various vitals, they even have a setup to mount it.
It can interact with a variety of aftermarket ECUs, and I think it can do ODB2 data (but you can't get boost info from OBD2 as it's not native to the Mazda ECU).
It can interact with a variety of aftermarket ECUs, and I think it can do ODB2 data (but you can't get boost info from OBD2 as it's not native to the Mazda ECU).
-
bruce
- Speed Racer
- Posts: 7662
- Joined: Fri Apr 25, 2003 11:00 am
- Vehicle: NA8 - Turbo
- Location: Victoria
- Contact:
Return to “MX5 Audio, Electronics & Lighting”
Who is online
Users browsing this forum: No registered users and 5 guests


