LOL, I'm not that anal!
The last 2x pictures were for DIYAUTOTUNE to make it absolutely clear where I mounted the relay since Ben wanted to know because they hadn't thought about RHD cars. I added them here too for clarification.
Lokiel's "Gina" (2004 Titanium SE)
Moderators: timk, Stu, zombie, Andrew, The American, Lokiel, -alex, miata, StanTheMan, greenMachine, ManiacLachy, Daffy
-
Lokiel

- Forum legend
- Posts: 4126
- Joined: Thu May 28, 2009 2:39 pm
- Vehicle: NB SE
- Location: Brisbania
Re: Lokiel's "Gina" (2004 Titanium SE)
Don't worry about dying, worry about not living!
Garage Thread: http://www.mx5cartalk.com/forum/viewtopic.php?f=57&t=76716
Garage Thread: http://www.mx5cartalk.com/forum/viewtopic.php?f=57&t=76716
-
Lokiel
- Forum legend
- Posts: 4126
- Joined: Thu May 28, 2009 2:39 pm
- Vehicle: NB SE
- Location: Brisbania
Re: Lokiel's "Gina" (2004 Titanium SE)
PaulF wrote:Nice heads-up on the single DIN unit. I usually avoid unknown Chinese stuff but if you liked the first one enough to buy the new model, that seems like a pretty good endorsement.
High quality head units in a convertible are a waste of money IMO and the advantage of Android Head Units is massive over dedicated/proprietary head units since you can add your own Apps and GoogleMaps is free, you don't have to pay A$400 to upgrade proprietary maps.
Chinese head units are cheap enough to replace every few years with upgraded versions of Android and hardware.
I do wish the screens were better though
Cardboard shrouds can help with glare but nothing helps if the sun is behind you
The Chinese mounting solutions are usually rubbish compared to the better brands though, you can jam them in but getting them out again is hard/impossible, they don't have slick mechanisms and mouldings to facilitate this like the better brands do.
Don't worry about dying, worry about not living!
Garage Thread: http://www.mx5cartalk.com/forum/viewtopic.php?f=57&t=76716
Garage Thread: http://www.mx5cartalk.com/forum/viewtopic.php?f=57&t=76716
-
Lokiel
- Forum legend
- Posts: 4126
- Joined: Thu May 28, 2009 2:39 pm
- Vehicle: NB SE
- Location: Brisbania
Re: Lokiel's "Gina" (2004 Titanium SE)
I've been accumulating parts for a while now and had most of the parts needed to complete the engine bay modz I wanted.
Some of these made more sense to do together because the same components needed to be removed first so I waited and started last weekend:
1. QMax coolant re-rote
2. Install ID1050x injectors
3. Install Radium Fuel Rail with pressure sensor.
I already had Injector Dynamics ID1000 injectors installed but noted that my fuel tables were very rich compared to others and especially compared to the newer ID1050x injectors.
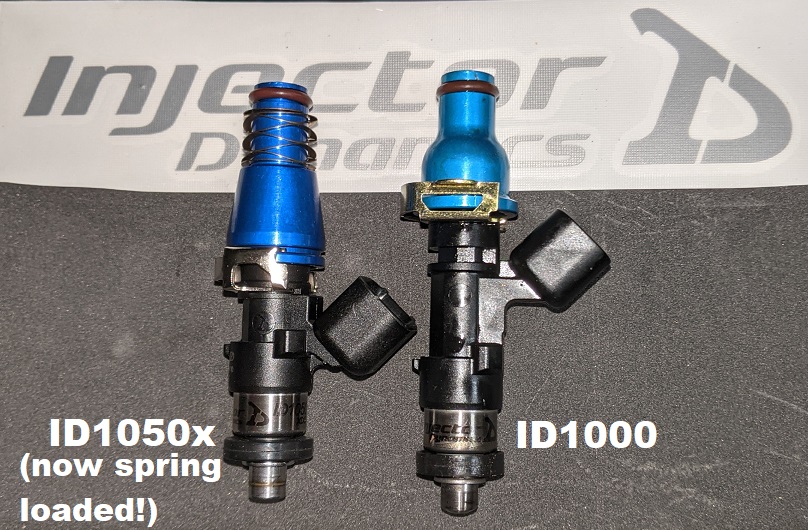
The ID1050x injectors are a later technology so that may have had something to do with it, my tuning could be improved, or maybe removing the charcoal cannister and venting that "now spare" hose to atmosphere instead of back to the fuel tank was causing problems.
I figured I should put a pressure sensor on the fuel rail to see that I'm actually getting 60psi there - maybe that charcoal cannister hose should have been blocked off and I'm running at a lower pressure?
My DIY sensor box supports 2x Pressure sensors and 4x temperature sensors which supply the data to the MS3 via CANbus and can be displayed on the OLED gauges.
I'm using one of each type for oil pressure and oil temperature so I'll use the spare pressure for fuel pressure and a spare temperature to record the temperature from the front of the engine since it'll be interesting to see the difference between the front and rear.
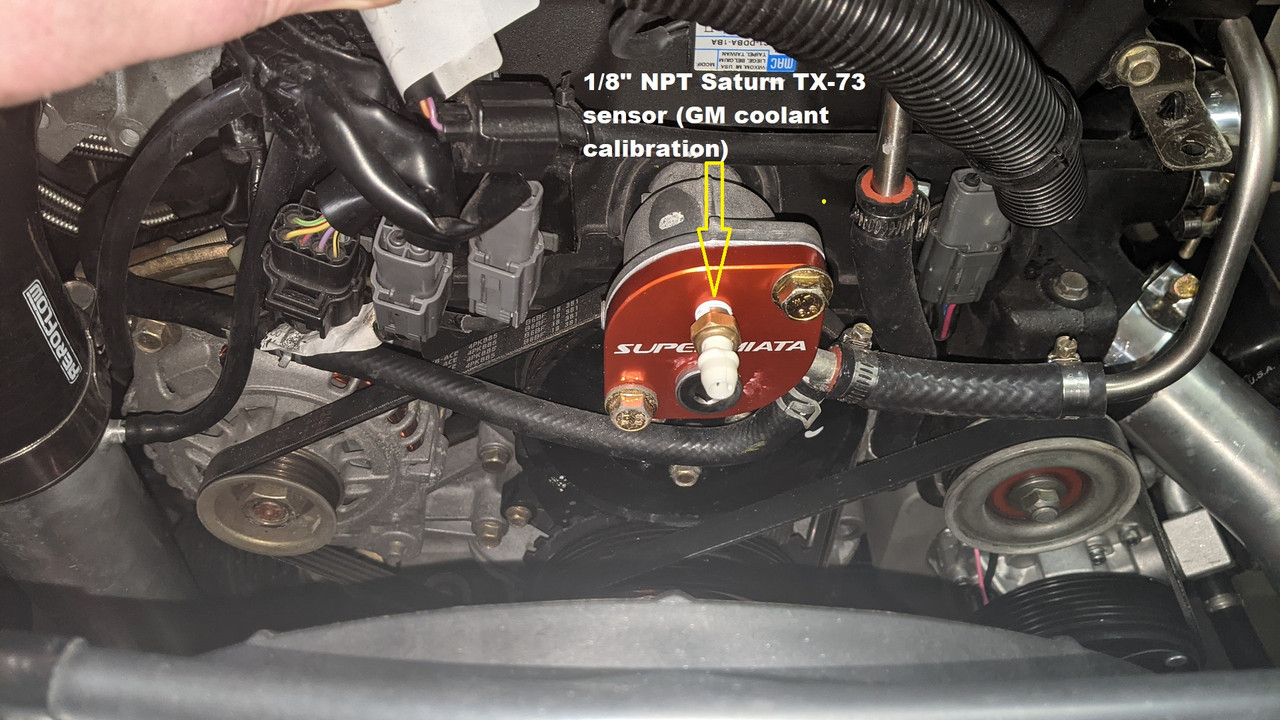
This is the QMax front block-off plate. I'm using a Saturn 1/8" NPT TX73 sensor since it has the same calibration as other GM coolant sensors, which makes it easy to configure in the MS3.
Installing the QMax fitting while the engine is still in the car was one of the hardest things I've ever done in the car.
Remove all underside plates before you start because you'll drop nuts, bolts and spanners down there constantly.
Remove everything you can from behind the engine to give yourself as much room to work as possible, including disconnecting both heater hoses.
I have bonnet struts in my car which made the job even more hassle since I had to work over top of them and I'm a "short-arse" - in hindsight I should have removed the cold-side bonnet strut because that's the only side I really used for the QMax install, I couldn't reach from the other side.
I connected the radiator hose to the rear block during the install since I found that by twisting the hose, I could get the block close to where I wanted it and some people said it was impossible to fit after the block was in place.
I used the Permatex sealant supplied instead of a gasket for both the front and rear.
Unfortunately the rear leaked after installation so I had to redo it the next weekend.
When I cleaned up the rear block again, I found a piece of the original gasket still there so maybe that caused the leak?
It took a LONG time with many attempts to install the block the first time so I do wonder if the sealant had hardened or I'd scratched a leak through it?
I switched out the original 195*F thermostat for a 180*F thermostat that had arrived during the week.
Years ago I'd switched my from OEM thermostat for a 78*C thermostat due to QLD's hot summers after advice from former-forum guru Davex3 (during a cyber-attack of the forum yeas ago, his account was deleted).
I must give credit to the Permatex sealant that is supplied in the kit, after removing all bolts, I had to separate the two QMax block pieces to fit the new thermostat using the bench and a rubber hammer and giving it several hard whacks (I didn't want to use a razor blade to cut the sealant in case I scuffed the mating surfaces).
After really giving the seat a thorough clean-up, I decided to use a gasket instead to be safe.
This time during the install, I could NOT get the top bolt to start threading into the block so I removed the radiator hose which made it easy.
Fitting the radiator hose back onto the barb was difficult but not what I'd call hard so leave it until the block is mounted on the engine.
Once installed, there appears to be plenty of room back there:

The OEM Fuel Damper "spaghetti" on the cold-side shelf was going to get in the way of the radiator hose.
I made 2x modz to the damper bracket, first cutting off the top section to give the radiator hose more clearance, then cutting it off altogether when it was still in the way.
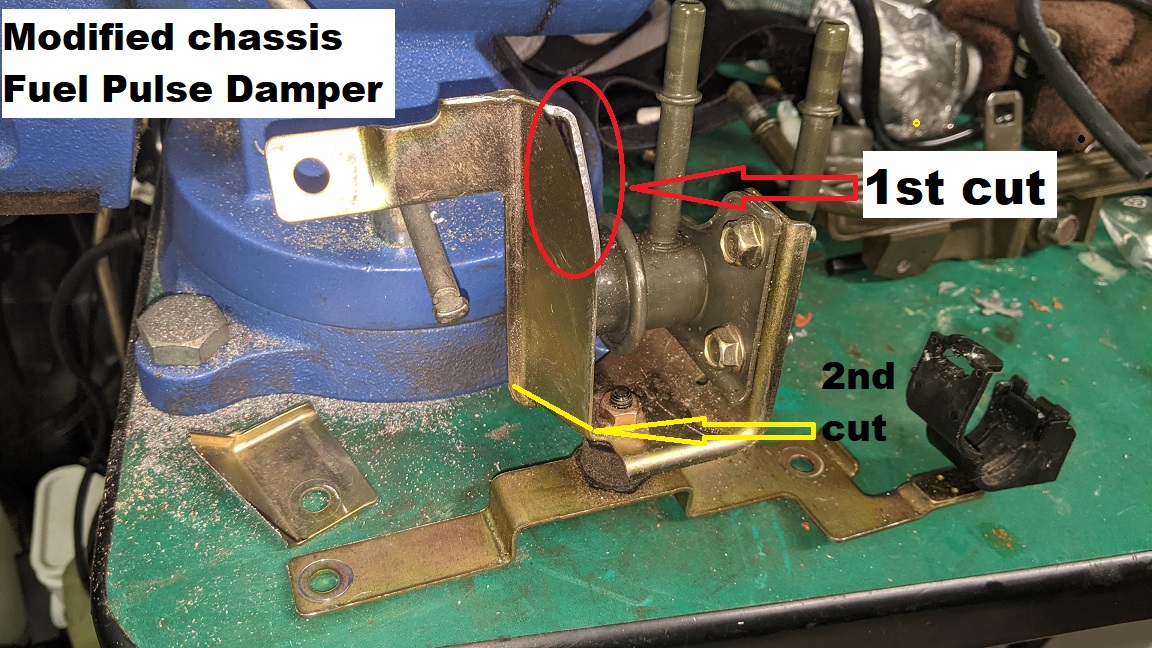
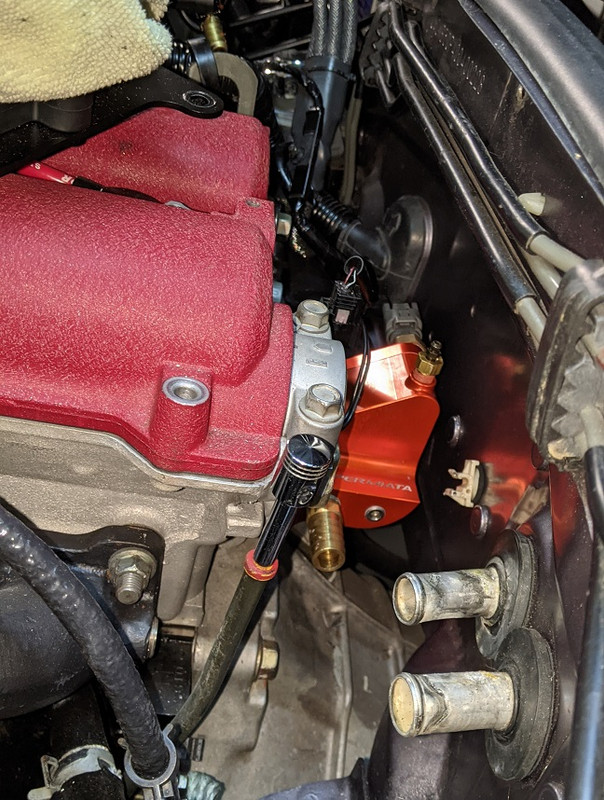
The "spaghetti hoses" were still in the way so I bent the hard-line from the tank to clear the hose and replaced the OEM plastic fuel lines with rubber hoses (I like the way the fuel hose now routes over the radiator hose to clear it):
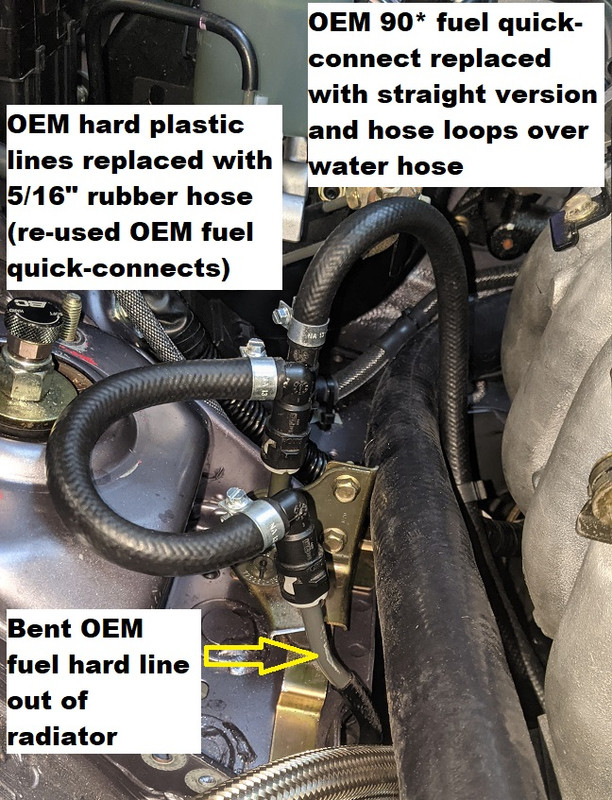
- in this photo, I've pushed the radiator hose down to show the bend in the hard line clearly
- so far very happy with the fuel line modz.
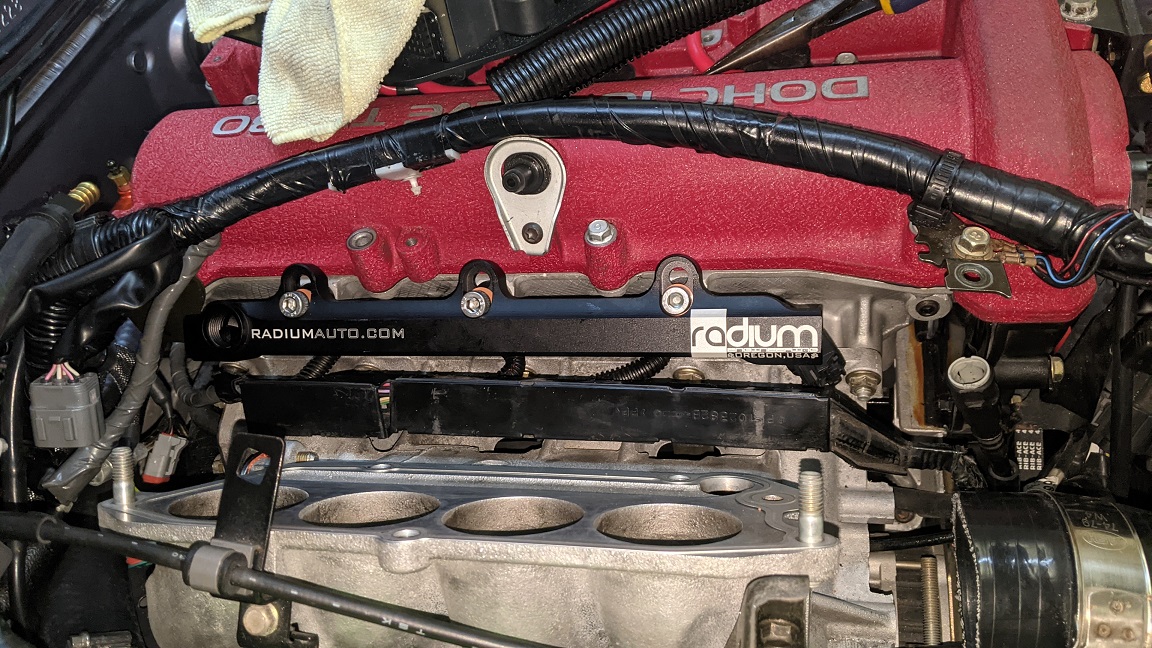
I bought a Radium fuel rail so that I could attach a Fuel Pressure sensor to it.
Most users reported that fitting the OEM Fuel Pulse Damper from the OEM Fuel Rail was dodgy so I bought the Radium Fuel Pulse damper too.
I bought their fittings kit too which includes a ORB-8 block-off plate (for the end of the rail - not used since my sensor goes there), ORB-8 - 1/8" NPT fitting for the sensor, an ORB-8 - male 6-AN barb, 90* 6-AN - 6-AN barb and male 6-AN - male fuel quick-connect fitting.
Unfortunately this combination of fittings was too long to connect into my OEM female quick-connect fitting and the OEM fuel lines are hard plastic so they can't be "flexed" in a manner that will fit.
When I cut the fuel line at the required spot I realised that there was no way that I'd be able to re-insert the OEM fitting so I simply replaced the whole line with a 5/16" rubber hose.
Originally I bought a 1/8" NPT Honeywell 100 PSI fuel pressure sensor for this job since NBs run at 60psi fuel pressure.
What I HATE about NPT sensors is that they don't thread in all the way because they're tapered - this is good because they don't leak but bad because mechanically they're not supported as well as if they screwed in all the way.
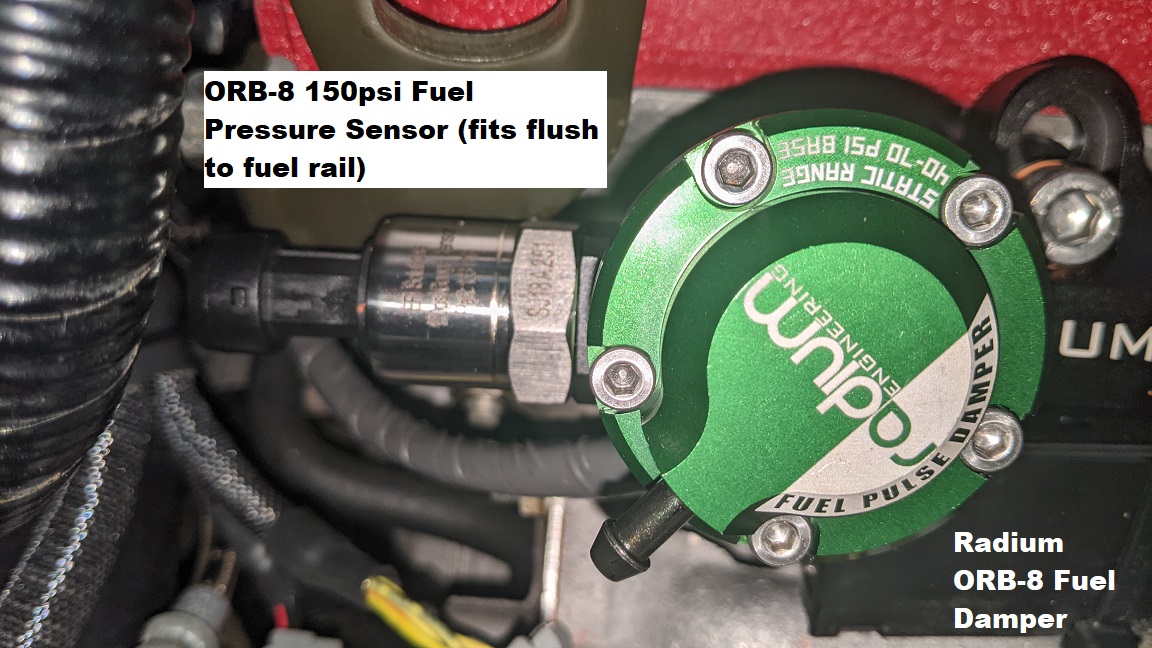
I didn't like the idea of the weight of the fuel pressure sensor only being held by a few threads so found online an ORB-8 150 psi fuel pressure sensor and used that instead.
It's definitely overkill in terms of range but screws all the way into the rail which is a good thing because this thing's "cannister" is 4x the length of the "cannister" on the Honeywell sensor:
- the Radium Fuel Damper's pressure barb will be connected to one of the free barbs at the front of the intake manifold
Now I have to re-install everything I pulled off and wire-in the 2x new sensors:(
Some of these made more sense to do together because the same components needed to be removed first so I waited and started last weekend:
1. QMax coolant re-rote
2. Install ID1050x injectors
3. Install Radium Fuel Rail with pressure sensor.
I already had Injector Dynamics ID1000 injectors installed but noted that my fuel tables were very rich compared to others and especially compared to the newer ID1050x injectors.
The ID1050x injectors are a later technology so that may have had something to do with it, my tuning could be improved, or maybe removing the charcoal cannister and venting that "now spare" hose to atmosphere instead of back to the fuel tank was causing problems.
I figured I should put a pressure sensor on the fuel rail to see that I'm actually getting 60psi there - maybe that charcoal cannister hose should have been blocked off and I'm running at a lower pressure?
My DIY sensor box supports 2x Pressure sensors and 4x temperature sensors which supply the data to the MS3 via CANbus and can be displayed on the OLED gauges.
I'm using one of each type for oil pressure and oil temperature so I'll use the spare pressure for fuel pressure and a spare temperature to record the temperature from the front of the engine since it'll be interesting to see the difference between the front and rear.
This is the QMax front block-off plate. I'm using a Saturn 1/8" NPT TX73 sensor since it has the same calibration as other GM coolant sensors, which makes it easy to configure in the MS3.
Installing the QMax fitting while the engine is still in the car was one of the hardest things I've ever done in the car.
Remove all underside plates before you start because you'll drop nuts, bolts and spanners down there constantly.
Remove everything you can from behind the engine to give yourself as much room to work as possible, including disconnecting both heater hoses.
I have bonnet struts in my car which made the job even more hassle since I had to work over top of them and I'm a "short-arse" - in hindsight I should have removed the cold-side bonnet strut because that's the only side I really used for the QMax install, I couldn't reach from the other side.
I connected the radiator hose to the rear block during the install since I found that by twisting the hose, I could get the block close to where I wanted it and some people said it was impossible to fit after the block was in place.
I used the Permatex sealant supplied instead of a gasket for both the front and rear.
Unfortunately the rear leaked after installation so I had to redo it the next weekend.
When I cleaned up the rear block again, I found a piece of the original gasket still there so maybe that caused the leak?
It took a LONG time with many attempts to install the block the first time so I do wonder if the sealant had hardened or I'd scratched a leak through it?
I switched out the original 195*F thermostat for a 180*F thermostat that had arrived during the week.
Years ago I'd switched my from OEM thermostat for a 78*C thermostat due to QLD's hot summers after advice from former-forum guru Davex3 (during a cyber-attack of the forum yeas ago, his account was deleted).
I must give credit to the Permatex sealant that is supplied in the kit, after removing all bolts, I had to separate the two QMax block pieces to fit the new thermostat using the bench and a rubber hammer and giving it several hard whacks (I didn't want to use a razor blade to cut the sealant in case I scuffed the mating surfaces).
After really giving the seat a thorough clean-up, I decided to use a gasket instead to be safe.
This time during the install, I could NOT get the top bolt to start threading into the block so I removed the radiator hose which made it easy.
Fitting the radiator hose back onto the barb was difficult but not what I'd call hard so leave it until the block is mounted on the engine.
Once installed, there appears to be plenty of room back there:
The OEM Fuel Damper "spaghetti" on the cold-side shelf was going to get in the way of the radiator hose.
I made 2x modz to the damper bracket, first cutting off the top section to give the radiator hose more clearance, then cutting it off altogether when it was still in the way.
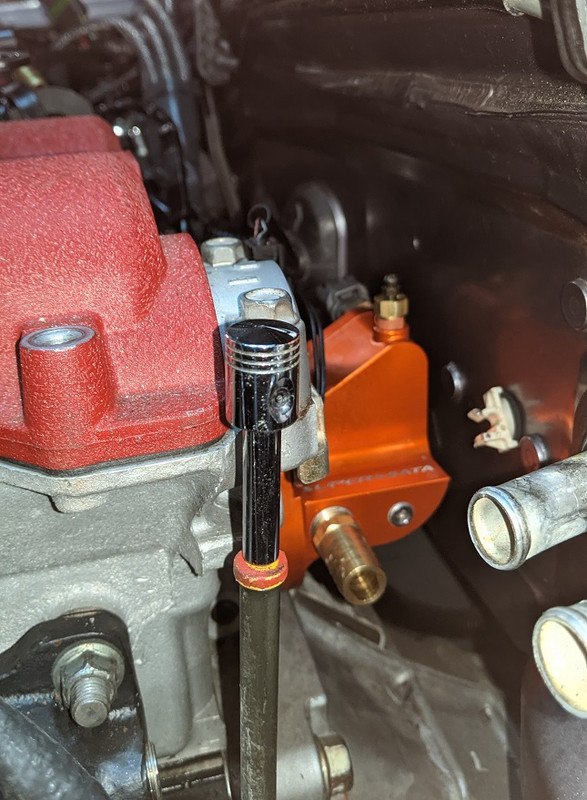
The "spaghetti hoses" were still in the way so I bent the hard-line from the tank to clear the hose and replaced the OEM plastic fuel lines with rubber hoses (I like the way the fuel hose now routes over the radiator hose to clear it):
- in this photo, I've pushed the radiator hose down to show the bend in the hard line clearly
- so far very happy with the fuel line modz.
I bought a Radium fuel rail so that I could attach a Fuel Pressure sensor to it.
Most users reported that fitting the OEM Fuel Pulse Damper from the OEM Fuel Rail was dodgy so I bought the Radium Fuel Pulse damper too.
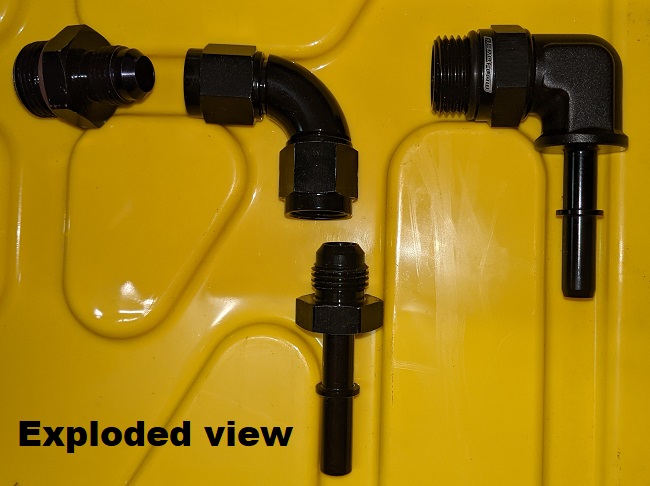
I bought their fittings kit too which includes a ORB-8 block-off plate (for the end of the rail - not used since my sensor goes there), ORB-8 - 1/8" NPT fitting for the sensor, an ORB-8 - male 6-AN barb, 90* 6-AN - 6-AN barb and male 6-AN - male fuel quick-connect fitting.
Unfortunately this combination of fittings was too long to connect into my OEM female quick-connect fitting and the OEM fuel lines are hard plastic so they can't be "flexed" in a manner that will fit.
When I cut the fuel line at the required spot I realised that there was no way that I'd be able to re-insert the OEM fitting so I simply replaced the whole line with a 5/16" rubber hose.
Originally I bought a 1/8" NPT Honeywell 100 PSI fuel pressure sensor for this job since NBs run at 60psi fuel pressure.
What I HATE about NPT sensors is that they don't thread in all the way because they're tapered - this is good because they don't leak but bad because mechanically they're not supported as well as if they screwed in all the way.
I didn't like the idea of the weight of the fuel pressure sensor only being held by a few threads so found online an ORB-8 150 psi fuel pressure sensor and used that instead.
It's definitely overkill in terms of range but screws all the way into the rail which is a good thing because this thing's "cannister" is 4x the length of the "cannister" on the Honeywell sensor:
- the Radium Fuel Damper's pressure barb will be connected to one of the free barbs at the front of the intake manifold
Now I have to re-install everything I pulled off and wire-in the 2x new sensors:(
Don't worry about dying, worry about not living!
Garage Thread: http://www.mx5cartalk.com/forum/viewtopic.php?f=57&t=76716
Garage Thread: http://www.mx5cartalk.com/forum/viewtopic.php?f=57&t=76716
-
Lokiel
- Forum legend
- Posts: 4126
- Joined: Thu May 28, 2009 2:39 pm
- Vehicle: NB SE
- Location: Brisbania
Re: Lokiel's "Gina" (2004 Titanium SE)
Ever spent time working on your car and realised everything you did was a waste of time?
That was me last weekend.
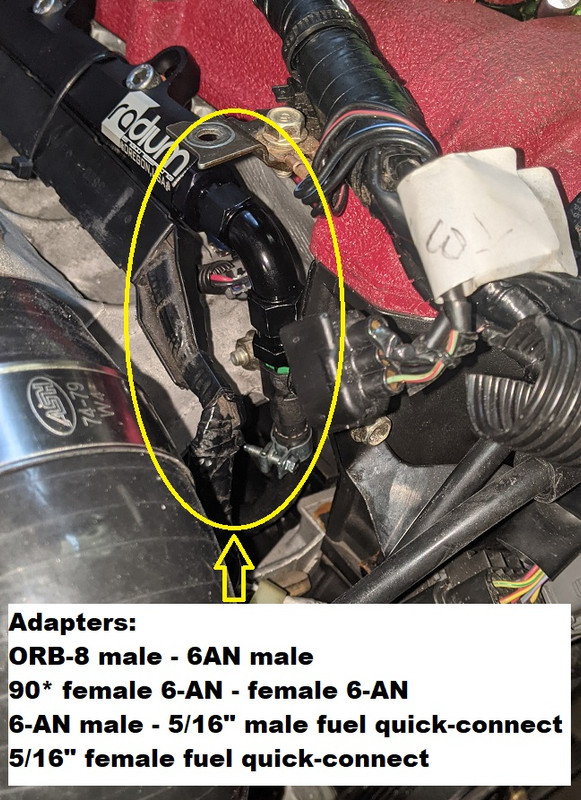
The previous weekend I fitted a Radium fuel rail and didn't like all the adapters I needed for the fuel line:
I found a 90* AeroFlow ORB-8 male - 5/6" fuel quick-connect male fitting so ordered it to replace the 3x fittings needed with a single fitting:
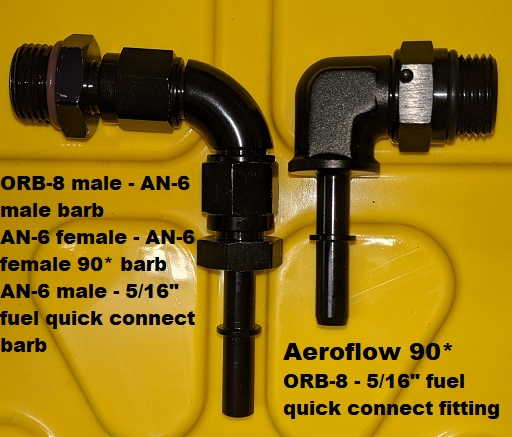
The single fitting is MUCH shorter than the combination of fittings so maybe I wouldn't have needed to cut the original OEM hard line?
When I got the fitting I realised that the barb was too short to allow the fuel-line disconnect tool to be inserted:
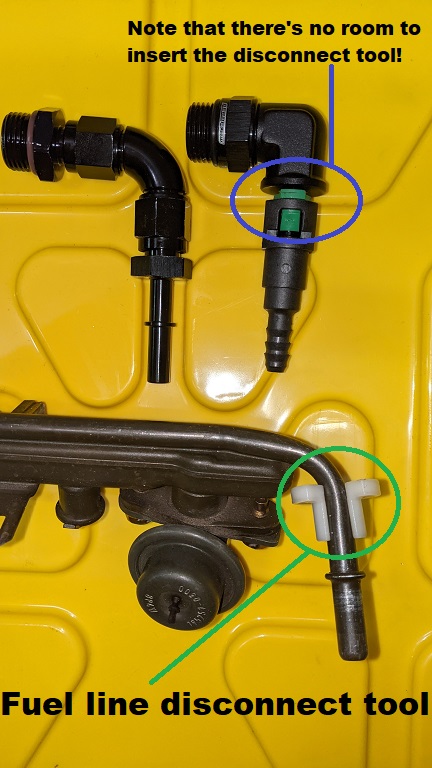
The only way to disconnect it from the OEM female fitting was to forceably insert 2x thin plastic strips either side of each other to disengage the OEM locking tabs.
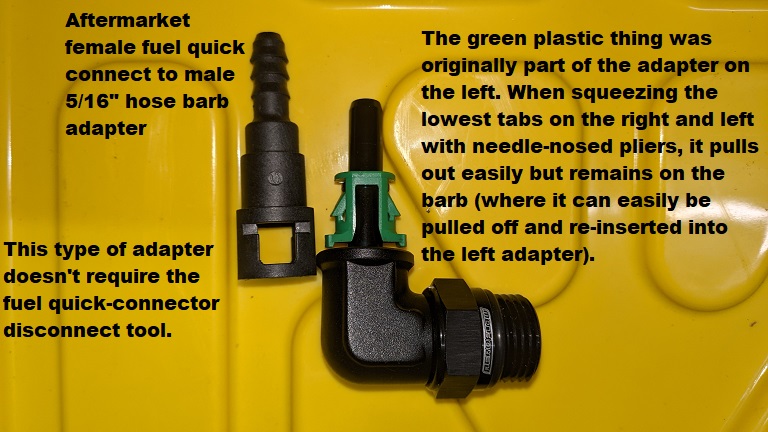
This wasn't easy so I ordered some aftermarket adapters that are easier to use and only require needle-nose pliers:
All this stuff arrived during the week so I could redo the fuel lines on the weekend.
Unfortunately I didn't take into account the fact that the 90* AeroFlow adapter wouldn't give enough clearance for the fuel hose from the intake manifold:
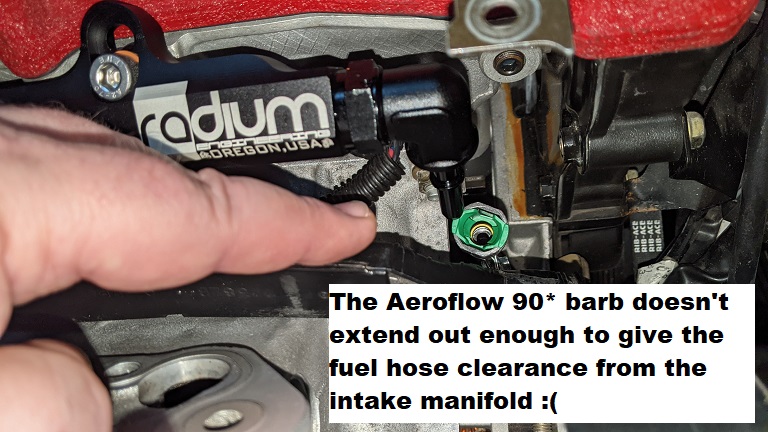
BUGGER!

... so I re-installed the original combination of fittings!
Next up was the Radium Fuel Pressure Damper.
I wanted to route the barb to one at the front of the intake manifold so I decided to re-clock it so that the hose could run along the fuel rail and under the intake manifold's neck.
After re-clocking it and installing the top half of the intake manifold, I realised that there wasn't enough room to attach the hose to the barb because the intake manifold was in the way:
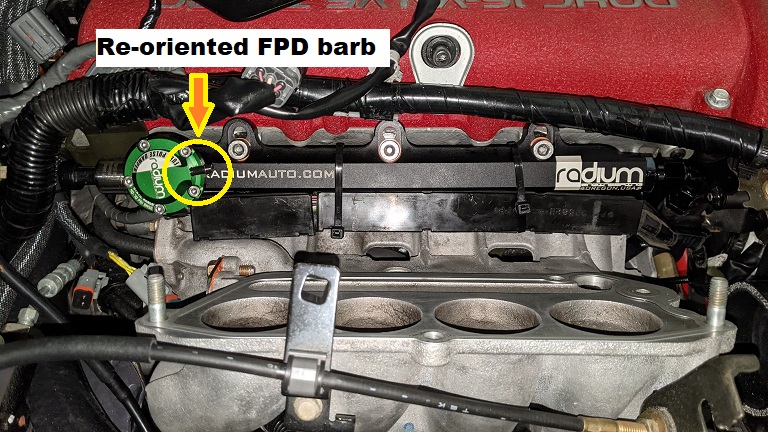
BUGGER!
... so I re-clocked the Radium FPD to its original position!
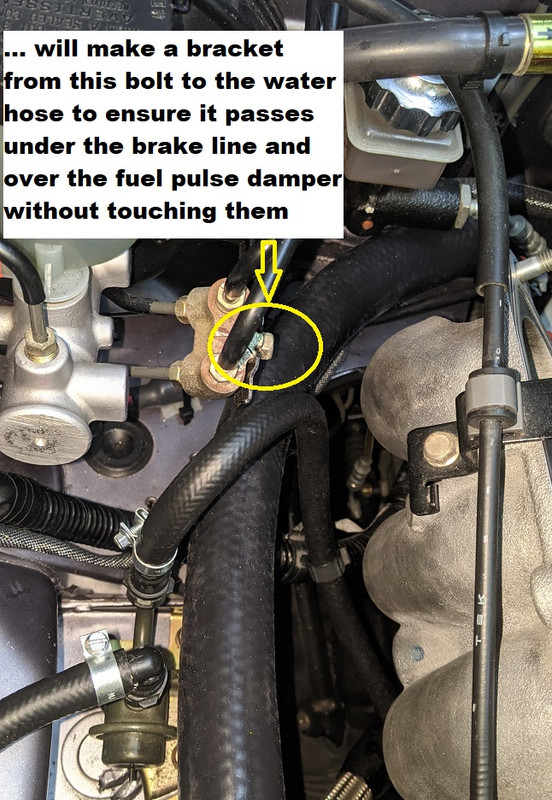
I still needed to do something about securing the hose for the coolant re-route.
Originally I planned to make a bracket to the bolt below:
After making a beautiful circular aluminium curl at the bottom of an aluminium strip for the hose to go through, I couldn't make it sit correctly on the hose and bracket because it's essentially on a "corner" bend in the hose.
BUGGER!
... so I threw the bracket away and had another look at the hose.
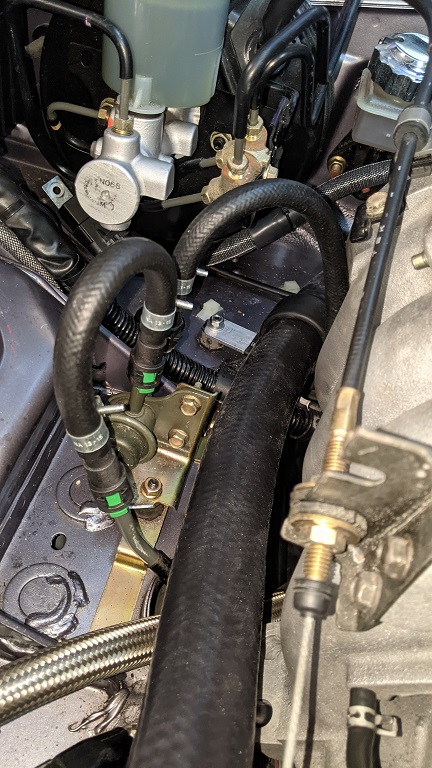
By pushing it down I could wedge it against the fuel pulse damper bracket.
Good enough!
I added a sacrificial piece of rubber to wrap the coolant hose from wearing on the bracket and zip-tied it in place, leaving enough length on the zip-ties to hold under the fuel pulse damper bracket's top bolt:
This holds the hose down quite well and doesn't impact the flexibility of the fuel pressure damper much.
So essentially all I really needed to do on the weekend was that last part, add sacrificial piece of rubber to wrap the coolant hose and zip-tie it to existing bracket - 10 minutes of work!
BUGGER!
That was me last weekend.
The previous weekend I fitted a Radium fuel rail and didn't like all the adapters I needed for the fuel line:
I found a 90* AeroFlow ORB-8 male - 5/6" fuel quick-connect male fitting so ordered it to replace the 3x fittings needed with a single fitting:
The single fitting is MUCH shorter than the combination of fittings so maybe I wouldn't have needed to cut the original OEM hard line?
When I got the fitting I realised that the barb was too short to allow the fuel-line disconnect tool to be inserted:
The only way to disconnect it from the OEM female fitting was to forceably insert 2x thin plastic strips either side of each other to disengage the OEM locking tabs.
This wasn't easy so I ordered some aftermarket adapters that are easier to use and only require needle-nose pliers:
All this stuff arrived during the week so I could redo the fuel lines on the weekend.
Unfortunately I didn't take into account the fact that the 90* AeroFlow adapter wouldn't give enough clearance for the fuel hose from the intake manifold:
BUGGER!
... so I re-installed the original combination of fittings!
Next up was the Radium Fuel Pressure Damper.
I wanted to route the barb to one at the front of the intake manifold so I decided to re-clock it so that the hose could run along the fuel rail and under the intake manifold's neck.
After re-clocking it and installing the top half of the intake manifold, I realised that there wasn't enough room to attach the hose to the barb because the intake manifold was in the way:
BUGGER!
... so I re-clocked the Radium FPD to its original position!
I still needed to do something about securing the hose for the coolant re-route.
Originally I planned to make a bracket to the bolt below:
After making a beautiful circular aluminium curl at the bottom of an aluminium strip for the hose to go through, I couldn't make it sit correctly on the hose and bracket because it's essentially on a "corner" bend in the hose.
BUGGER!
... so I threw the bracket away and had another look at the hose.
By pushing it down I could wedge it against the fuel pulse damper bracket.
Good enough!
I added a sacrificial piece of rubber to wrap the coolant hose from wearing on the bracket and zip-tied it in place, leaving enough length on the zip-ties to hold under the fuel pulse damper bracket's top bolt:
This holds the hose down quite well and doesn't impact the flexibility of the fuel pressure damper much.
So essentially all I really needed to do on the weekend was that last part, add sacrificial piece of rubber to wrap the coolant hose and zip-tie it to existing bracket - 10 minutes of work!
BUGGER!
Don't worry about dying, worry about not living!
Garage Thread: http://www.mx5cartalk.com/forum/viewtopic.php?f=57&t=76716
Garage Thread: http://www.mx5cartalk.com/forum/viewtopic.php?f=57&t=76716
-
PaulF

- Racing Driver
- Posts: 1801
- Joined: Fri Jan 28, 2011 5:55 pm
- Vehicle: NA6
- Location: Newcastle, NSW
Re: Lokiel's "Gina" (2004 Titanium SE)

-
bruce

- Speed Racer
- Posts: 7662
- Joined: Fri Apr 25, 2003 11:00 am
- Vehicle: NA8 - Turbo
- Location: Victoria
- Contact:
Re: Lokiel's "Gina" (2004 Titanium SE)
Love the Homer picture.
The best laid plans of mice and men.
The best laid plans of mice and men.
-
ManiacLachy

- Forum Guru
- Posts: 3235
- Joined: Mon Jan 13, 2014 2:35 pm
- Vehicle: NB SE
- Location: Brisbane
Re: Lokiel's "Gina" (2004 Titanium SE)
You did well to persist!
-
Nevyn72
- Speed Racer
- Posts: 2180
- Joined: Fri Nov 29, 2013 8:51 am
- Vehicle: ND - RF
- Location: Sydney
Re: Lokiel's "Gina" (2004 Titanium SE)
Is anyone still wondering why this project never seems to end... 

"A Convertible has a top you can put down when the weather's nice...... A Roadster has a top you can put up when the weather's bad."
-
bruce
- Speed Racer
- Posts: 7662
- Joined: Fri Apr 25, 2003 11:00 am
- Vehicle: NA8 - Turbo
- Location: Victoria
- Contact:
Re: Lokiel's "Gina" (2004 Titanium SE)
Much more interesting than the other 'never ending story' regards the simple act of buying a car.
-
greenMachine

- Forum Guru
- Posts: 3946
- Joined: Thu Apr 24, 2003 11:00 am
- Vehicle: NB SE
- Location: Sports car paradise - Canberra
- Contact:
Re: Lokiel's "Gina" (2004 Titanium SE)
Interesting, entertaining, but most importantly - valuable information and advice - even if sometimes of the 'how not to do it' variety. 
As a self-taught DIY mechanic (that sounds a bit too grand for the reality), most of my learnings have come from my mistakes, but in recent times I can learn from the mistakes of others, such is the wonder of the interwebs! So a big shout out to Lokiel, Lachy and all the others who have shared their trials and triumphs for us!
As a self-taught DIY mechanic (that sounds a bit too grand for the reality), most of my learnings have come from my mistakes, but in recent times I can learn from the mistakes of others, such is the wonder of the interwebs! So a big shout out to Lokiel, Lachy and all the others who have shared their trials and triumphs for us!
I never met a horsepower I didn't like (thanks bwob)
Build thread
NB SE - gone to the dark side (and loving it )
)
Build thread
NB SE - gone to the dark side (and loving it
-
Lokiel
- Forum legend
- Posts: 4126
- Joined: Thu May 28, 2009 2:39 pm
- Vehicle: NB SE
- Location: Brisbania
Re: Lokiel's "Gina" (2004 Titanium SE)
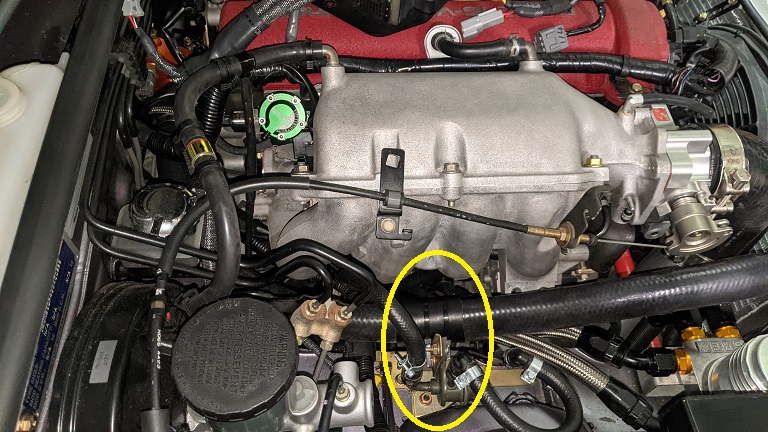
I wasn't really happy with the radiator hose route solution and felt that it could be improved (using sacrificial rubber pads with zip ties is a track-day solution).
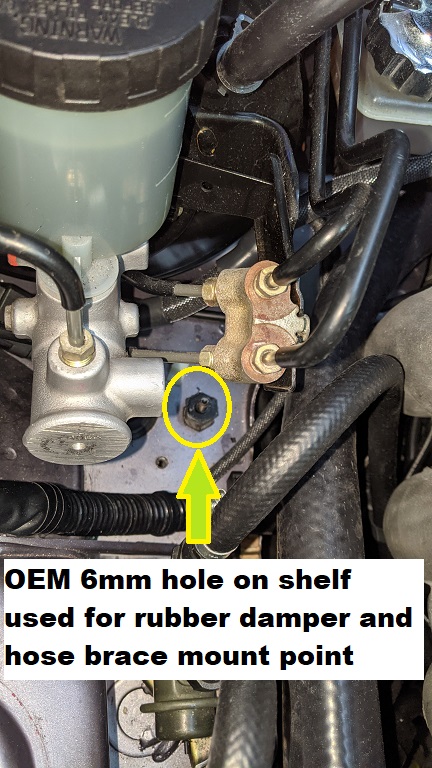
Rather than mounting a radiator hose bracket from above, I could mount it on the cold-side shelf, using a rubber bung that would clear the shelf lip that runs around the rear corner:
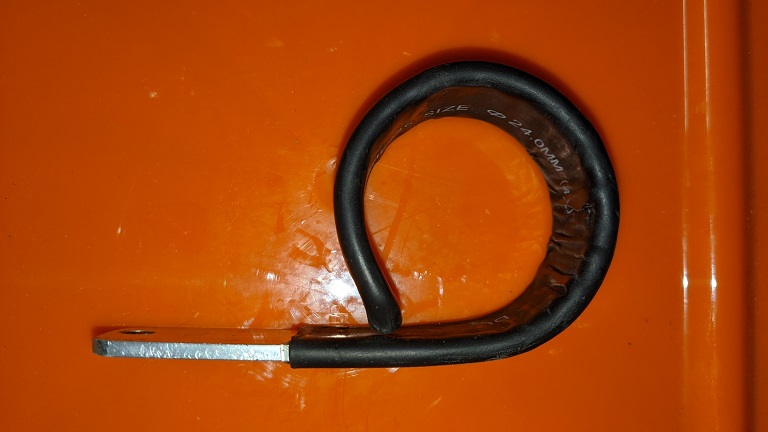
My first attempt at a DIY bracket/P-Clip used a 25x0.5mm aluminium strip but it was too flimsy and needed reinforcement on the base:
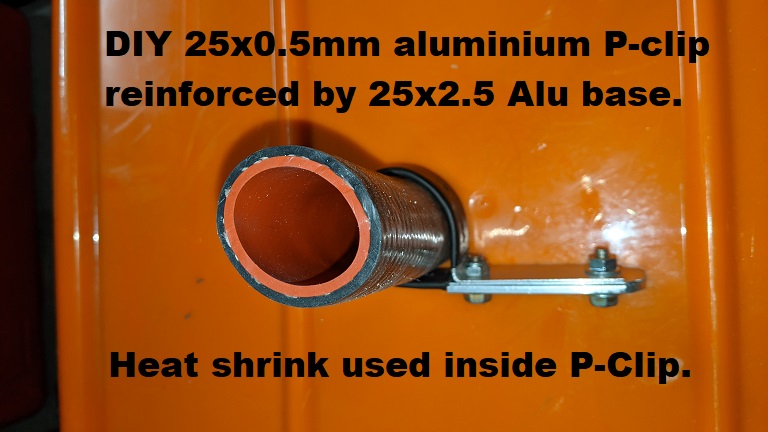
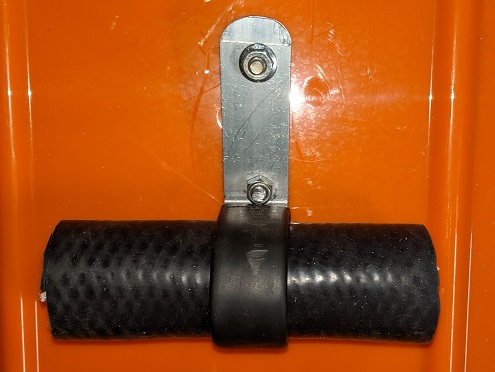
I re-made it from a single 25x2.5mm aluminium strip.
This thickness holds its shape better than the 0.5mm thick Alu so I wouldn't need the sharp bend I used in the 0.5mm P-Clip (it would snap with 2.5mm aluminium anyway).
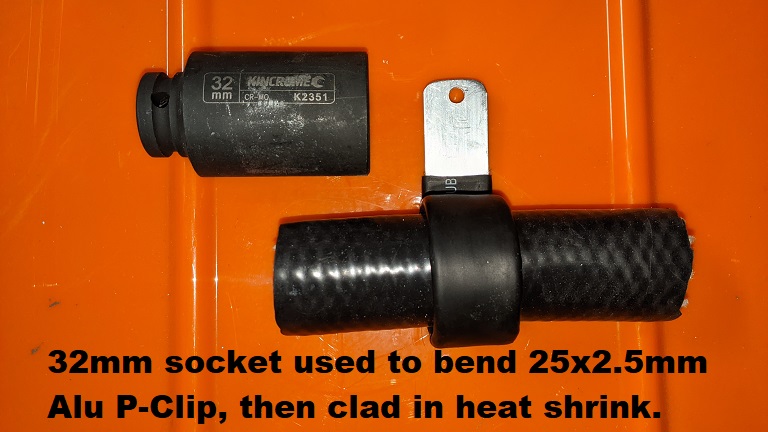
Tip: It was hard to slide the heat-shrink around the circular part and you'll get a lot of creases.
To minimise creases in the final product:
1. slide the heat-shrink all the way on
2. pull it back to remove creases (you probably wont eliminate many but it's worth trying)
3. when you start heating the heat shrink, start at the inner end and heat about 20mm until it shrinks, then roll a small socket inside from the inner end to the outer end to flatten out creases.
4. rinse and repeat.
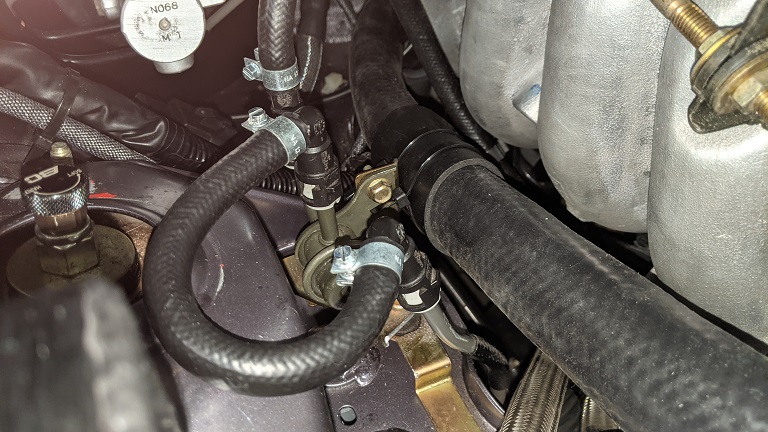
I clipped about 10mm off the end of the radiator hose, twisted the hose until it cleared the fuel damper bracket - and there was "MUCH HAPPINESS!":
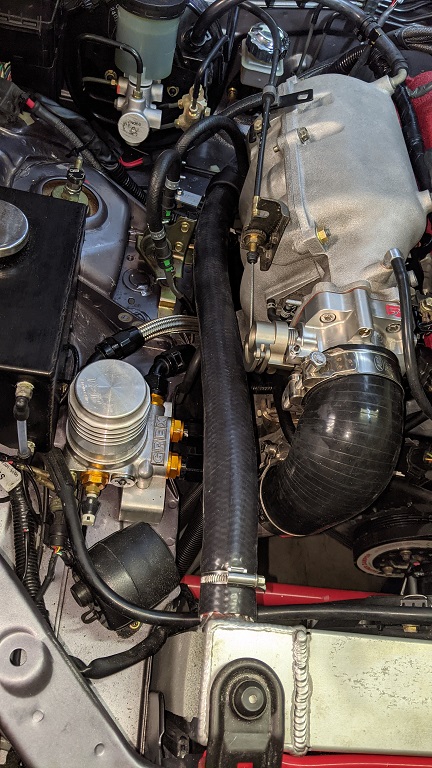
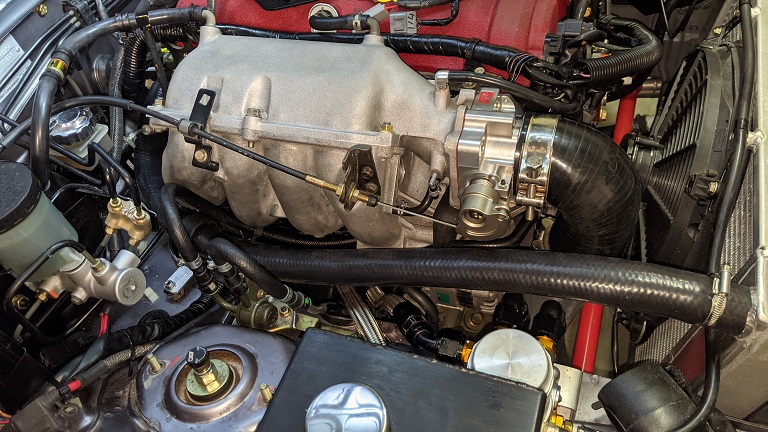
I also replaced the fuel damper's front two female OEM 90* fuel quick-disconnect barbs with straight ones to match the rear one and, being vertical, the hose takes up less real estate.
Rather than mounting a radiator hose bracket from above, I could mount it on the cold-side shelf, using a rubber bung that would clear the shelf lip that runs around the rear corner:
My first attempt at a DIY bracket/P-Clip used a 25x0.5mm aluminium strip but it was too flimsy and needed reinforcement on the base:
I re-made it from a single 25x2.5mm aluminium strip.
This thickness holds its shape better than the 0.5mm thick Alu so I wouldn't need the sharp bend I used in the 0.5mm P-Clip (it would snap with 2.5mm aluminium anyway).
Tip: It was hard to slide the heat-shrink around the circular part and you'll get a lot of creases.
To minimise creases in the final product:
1. slide the heat-shrink all the way on
2. pull it back to remove creases (you probably wont eliminate many but it's worth trying)
3. when you start heating the heat shrink, start at the inner end and heat about 20mm until it shrinks, then roll a small socket inside from the inner end to the outer end to flatten out creases.
4. rinse and repeat.
I clipped about 10mm off the end of the radiator hose, twisted the hose until it cleared the fuel damper bracket - and there was "MUCH HAPPINESS!":
I also replaced the fuel damper's front two female OEM 90* fuel quick-disconnect barbs with straight ones to match the rear one and, being vertical, the hose takes up less real estate.
Don't worry about dying, worry about not living!
Garage Thread: http://www.mx5cartalk.com/forum/viewtopic.php?f=57&t=76716
Garage Thread: http://www.mx5cartalk.com/forum/viewtopic.php?f=57&t=76716
-
The American
- Forum Guru
- Posts: 1509
- Joined: Fri Jun 29, 2012 9:23 pm
- Vehicle: NB8B - Turbo
- Location: Brisbane, Qld. Previously Perth WA
- Contact:
Re: Lokiel's "Gina" (2004 Titanium SE)
My reroute hose is currently unsecured passing through that area, which is a very congested space. I had contemplated replacing some of it with aluminium pipe, but haven’t figured out how to mount it.
Thanks for sharing as always!
Thanks for sharing as always!
-
greenMachine
- Forum Guru
- Posts: 3946
- Joined: Thu Apr 24, 2003 11:00 am
- Vehicle: NB SE
- Location: Sports car paradise - Canberra
- Contact:
Re: Lokiel's "Gina" (2004 Titanium SE)
While I have not yet got serious about my re-route install, I have been contemplating the question of the location of the hose, preventing chafing, and whether or how much to replace with pipe.
The heatshrink cladding for the P clamp is pure genius. It seems to me though, the wrinkles might be an asset, holding the hose firmly and providing greater depth of cushioning material? And as they are inside, are not going to be visible anyway when installed.
The heatshrink cladding for the P clamp is pure genius. It seems to me though, the wrinkles might be an asset, holding the hose firmly and providing greater depth of cushioning material? And as they are inside, are not going to be visible anyway when installed.
I never met a horsepower I didn't like (thanks bwob)
Build thread
NB SE - gone to the dark side (and loving it )
Build thread
NB SE - gone to the dark side (and loving it
-
PaulF
- Racing Driver
- Posts: 1801
- Joined: Fri Jan 28, 2011 5:55 pm
- Vehicle: NA6
- Location: Newcastle, NSW
Re: Lokiel's "Gina" (2004 Titanium SE)
Simple and effective, nice work! My reroute hose is still on the "sacrificial layer and zipties" solution I threw together nearly 2 years ago. This might be my next iteration.
I think a hard pipe is a better solution again, mainly because the smaller OD makes more space around it, but that's still beyond my fabrication capabilities.
I think a hard pipe is a better solution again, mainly because the smaller OD makes more space around it, but that's still beyond my fabrication capabilities.
-
Lokiel
- Forum legend
- Posts: 4126
- Joined: Thu May 28, 2009 2:39 pm
- Vehicle: NB SE
- Location: Brisbania
Re: Lokiel's "Gina" (2004 Titanium SE)
PaulF wrote:Simple and effective, nice work! My reroute hose is still on the "sacrificial layer and zipties" solution I threw together nearly 2 years ago. This might be my next iteration.
I think a hard pipe is a better solution again, mainly because the smaller OD makes more space around it, but that's still beyond my fabrication capabilities.
Hard pipes still need to be held in at least 2x places and you'll need 2x extra hose clamps, one for each end.
I found 1x mount point hard enough to find with my set up.
If you don't have the fuel damper there's a lot of room there.
Some guys attach mount brackets to the intake manifold but that's vibrating due to the engine and vibrates over a wider range than the engine because the outer side of the manifold hangs out quite far from the engine's centre. I prefer a chassis mount since it vibrates less.
As always, we work with what we've got.
I like to see other people's implementations, they've helped me in the past, whether they're good or bad (so I know what to avoid), so am happy to contribute to the knowledge pool. If people have constructive criticisms, valid concerns, or improvements, they're appreciated and I'm anal enough to implement them.
Don't worry about dying, worry about not living!
Garage Thread: http://www.mx5cartalk.com/forum/viewtopic.php?f=57&t=76716
Garage Thread: http://www.mx5cartalk.com/forum/viewtopic.php?f=57&t=76716
Who is online
Users browsing this forum: No registered users and 13 guests


