Definately one of the better bibles.
DON'T BLOODY GUESS!!!!!! use the cattledog.
http://www.hastingsmfg.com/ContentData. ... tentid=103
Terry
Engine Rebuild Stuff
Moderators: timk, Stu, zombie, Andrew, -alex, miata, PUR157
-
tbro
- Racing Driver
- Posts: 1125
- Joined: Thu Jul 26, 2007 5:46 pm
- Vehicle: NA6
- Location: North Brisbane
Engine Rebuild Stuff
"Racing shouldn't be for rich idiots, but for all idiots"
-
NMX516
- Speed Racer
- Posts: 2057
- Joined: Mon Jun 19, 2006 12:05 pm
- Vehicle: NB SP
- Location: Brisbane
Engine Rebuild Stuff
Thanks for the link Terry. I'm going to be doing the ET up over the next little while, so in the process of researching what bits and pieces I will need, and from where etc... I should have a talk to you sometime about where you got your cylinder head done, I remember you telling me good things about the guy who did it for you.
Pain is temporary, quitting lasts forever.
-
tbro
- Racing Driver
- Posts: 1125
- Joined: Thu Jul 26, 2007 5:46 pm
- Vehicle: NA6
- Location: North Brisbane
Engine Rebuild Stuff
Courtesy of Engine Builders Mag.
The following are useful tips for technicians and engine specialists who spend any time sealing up engines.
1. Make sure all the head bolts are in perfect condition with clean, undamaged threads. Dirty or damaged threads can give false torque readings as well as decrease a bolt’s clamping force by as much as 50%! Wire brush all bolt threads, carefully inspect each one, and replace any that are nicked, deformed or worn. If a bolt doesn’t thread into a hole smoothly with finger force alone, there is a problem.
On aftermarket studs or bolts, never use a die to re cut the threads. Most have “rolled” threads, which are stronger than standard threads. Use a thread chaser to clean up the threads.
2. Dirty or deformed hole threads in the engine block can reduce clamping force the same as dirty or damaged threads on the bolts. Run a bottoming tap down each bolt hole in the block. The tops of the holes should also be chamfered so the uppermost threads won’t pull above the deck surface when the bolts are tightened.
Finally, clean all holes to remove any debris. If the block deck has been resurfaced and you are using studs rather than head bolts, chamfer the top of each hole
3. For head bolts that screw into blind holes, lightly lubricate the bolt threads as well as the underside of the bolt heads with engine oil. Make sure the bolts do not bottom out or hydrolock because of oil trapped in the blind hole.
For head bolts that extend into a coolant jacket, coat the threads with a flexible sealer. Failure to coat the threads may allow coolant to leak past the bolt.
4. Because TTY head bolts are permanently deformed once they are tightened, they should not be reused. Reusing TTY bolts will cause them to stretch further, which increases the risk of breakage. A stretched bolt also will not hold the same torque load as before, which may cause a loss of clamping force resulting in head gasket leakage.
5. Check bolt lengths. Make sure you have the correct length bolts for the application and for each hole location (some holes require longer or shorter bolts than others). If a bolt is too short and only engages a few threads in the block, it may pull the threads out of the block.
Bolts should also be measured or compared to one another to check for stretch. Any bolt found to be stretched must be replaced because 1) it may be dangerously weak, 2) it won’t hold torque properly, and 3) it may bottom out when installed in a blind hole.
6. When installing head bolts in aluminum cylinder heads, hardened steel washers must be used under the bolt heads to prevent galling of the soft aluminum and to help distribute the load. Make sure the washers are positioned with their rounded or chamfered side up, and that there is no debris or burrs under the washers.
7. Resurfacing a cylinder head decreases its overall height, so be sure to check bolt lengths to make sure they won’t bottom out in blind holes. If a bolt bottoms out, it will apply little or no clamping force on the head, which may allow the gasket to leak.
If a head has been milled and one or more head bolts may be dangerously close to bottoming out, the problem can be corrected by either using hardened steel washers under the bolts to raise them up, or by using a copper head gasket shim in conjunction with the new head gasket to restore proper head height.
8. Always look up the specified tightening sequence and recommended head bolt torque values for an engine before installing the head gasket. Never guess. Complete cylinder head torque specifications for domestic and import vehicles can be found in service manuals and torque tables published by gasket manufacturers.
9. Use an accurate torque wrench to tighten standard-type head bolts in three to five incremental steps following the recommended sequence and torque specs for the application. Tightening the bolts down gradually creates an even clamping force on the gasket and reduces head distortion. It’s a good idea to double check the final torque readings on each head bolt to make sure none have been missed and that the bolts are retaining torque normally.
If a bolt is not coming up to normal torque or is not holding a reading, it means trouble. Either the bolt is stretching or the threads are pulling out of the block.
With TTY head bolts, use a “Torque-To-Angle Indicator” gauge with a torque wrench to achieve proper bolt loading. Don’t guess on the angle. Be exact.
10. If a head gasket requires retorquing (most do not), run the engine until it reaches normal operating temperature (usually 10 to 15 minutes), then shut it off. Retighten each head bolt in the same sequence as before while the engine is still warm. If the engine has an aluminum cylinder head or block, however, don’t retorque the head bolts until the engine has cooled back down to room temperature.
On some applications with retorque-style head gaskets, it may be necessary to retorque the head a third time after a specified time or mileage interval due to the design of the engine. Follow the vehicle manufacturer’s recommendations.
Did You Know? In an engine with 4” cylinder bores and peak combustion pressures of around 1,100 psi, each cylinder exerts about 13,827 lbs. of pressure against the cylinder head at full throttle. In fact, head bolts may have to handle loads of more than 5 tons per bolt at wide-open throttle!
"Racing shouldn't be for rich idiots, but for all idiots"
-
tbro
- Racing Driver
- Posts: 1125
- Joined: Thu Jul 26, 2007 5:46 pm
- Vehicle: NA6
- Location: North Brisbane
Re: Engine Rebuild Stuff
Stuff you may use, but it will help those who don't wanna or do have the ability ,to understand WTF some babble on about.
Fuel injection, thanks to 1red5
http://miataturbo.wikidot.com/fuel-injectors
http://www.rceng.com/technical.aspx
http://www.ctlab.ru/docs/injectors/nippon-denso.html
http://miataturbo.wikidot.com/fuel-injectors
Cylinder head
http://pirate4x4.com/tech/billavista/PD ... asives.pdf
Torque guide
http://www.miata.net/garage/torque.html
A bit of fun
http://kalecoauto.com/index.php?main_page=index
Terry
"Racing shouldn't be for rich idiots, but for all idiots"
-
timk

- Racing Driver
- Posts: 1928
- Joined: Fri Dec 31, 2004 3:16 pm
- Vehicle: NC
Re: Engine Rebuild Stuff
tbro wrote:3. For head bolts that screw into blind holes, lightly lubricate the bolt threads as well as the underside of the bolt heads with engine oil. Make sure the bolts do not bottom out or hydrolock because of oil trapped in the blind hole.
On my engine this was a pretty big problem even with the ARP head studs, it had loads of junk/oil sitting in the holes in the block. Before cleaning you could definitely feel the hydrolock when winding in the studs hand tight.
I think the head studs are worth the $120 odd bucks if only for the advantage of easily lining up the head!
-
StanTheMan

- Forum legend
- Posts: 6824
- Joined: Thu Apr 24, 2003 11:00 am
- Vehicle: NA6
- Location: Balgowlah
Re: Engine Rebuild Stuff
tbro wrote:Stuff you may use, but it will help those who don't wanna or do have the ability ,to understand WTF some babble on about.
Cylinder head
http://pirate4x4.com/tech/billavista/PD ... asives.pdf
Terry
I recently did this although I found this independently to this thread. Wish I'd seen this thread 2 moths ago.
The guide is awesome. I followed it to the letter without removing too much material in the intake & exhaust on the B6 head.
I figured that because I was following the guide to the letter, I also purchased the same kit that they use in particular guide because of the Buff Rolls included in the kit.
I had to find it over in the USA and we all know USA Postal charges an Arm & a Leg for posting to AU.
The kit didn't come in the box either. that was another reason I went for it. I like to have it organized.
I picked up an organizer from Bunning's for about $7 or $8
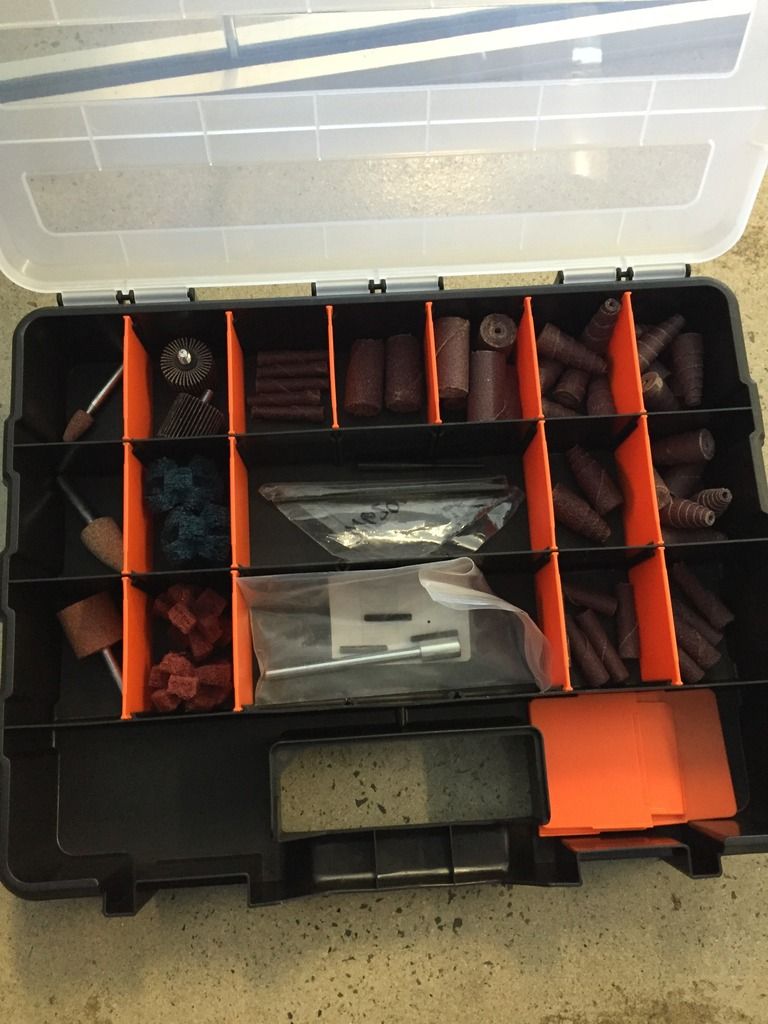
The Buff Rolls are far to big to be useful on the MX5
You can pick up good kits for about the 3rd of the price from Ebay or other places with the right abrasives you need.(I cant vouch for any quality though) abrasive I was able to use from that kit were great. I had no issues with them.
I also ended up polishing the exhaust ports with a cheap kit from Bunnings.
However the guide is awesome & tells you everything you need to know for a basic match & port job.
Next time I'll also be getting the head & Exhaust treated with a TR Coating to make it extra special.
Satans Ride called F33nix the resurrected NA6
-
madjak
- Racing Driver
- Posts: 1117
- Joined: Tue Dec 31, 2013 12:11 pm
- Vehicle: NA6
Re: Engine Rebuild Stuff
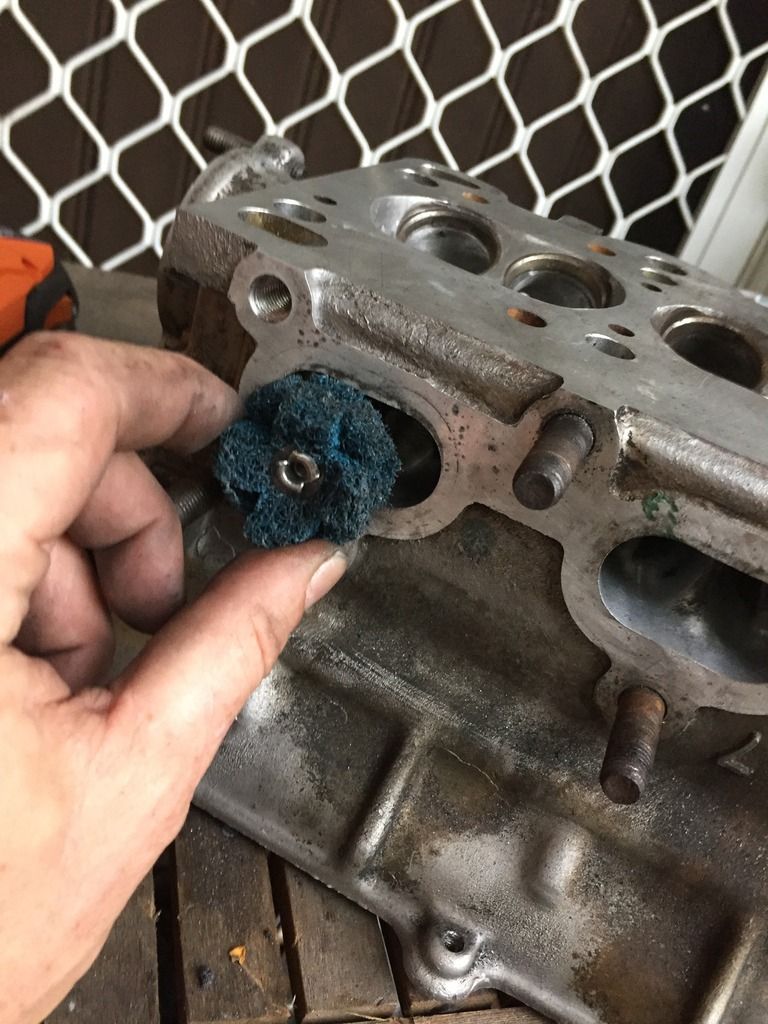
I found a local abrasives place that sell the sanding rolls. If you need anymore I can get you the details.
For my head I used the dremel scotch brite rolls which worked brilliantly. Don't push to hard on them or hit any sharp edges and they last a while. They come in 3 different grits so you can step up to an almost polished look.
When installing an aftermarket water pump, check that it's not hitting on the cylinder wall. I've recently pulled down two rebuilt NA8 engines, both with aftermarket water pumps and there are wear marks on the outside casting of the cylinder wall. Both engines were cooked.
NA8: N/A 200whp | Haltech | Skunk2 Intake | S90 TB | RCP | 5 speed c/r dogbox | 4.78 diff | AST Shocks
Barbs L: 64.12 | S: 58.62 | Collie: 49.72
Barbs L: 64.12 | S: 58.62 | Collie: 49.72
-
manga_blue
- Forum Guru
- Posts: 4897
- Joined: Mon Apr 24, 2006 7:27 pm
- Vehicle: NA8
- Location: Moruya, NSW
Re: Engine Rebuild Stuff
I use a quality cutting bit on a good 1/4" die grinder for major shaping, then go to strips of 80 or 120 grit cut from fabric backed belt sander belt for finishing off. Basically you cut the sander belt into roughly 120 x 20-30mm strips and use electrical tape to secure a strip to the end of an old 1/4" drill bit held in the die grinder. You can cut a bit off the end of the strip from time to time to expose sharper paper. I find this cuts faster and easier than flappy discs, a longer bit gives you much better reach into inlet manifold pipes and it's a helluva lot cheaper. You can go to 400 grit wet'n'dry for polishing the exhaust ports but that paper does get a bit fragile at 10,000rpm.
’95 NA8
Return to “MX5 Technical Guides”
Who is online
Users browsing this forum: No registered users and 2 guests


